Secure Torrenting with Docker: Transmission behind WireGuard
Table of Contents
A thorough guide of my torrenting setup. You will find everything here to set this up for yourself. It includes step by step instructions, as well as the complete scripts I use.
It’s not specific to my VPN provider1 or server OS, though I will use them as examples.
WireGuard #
Obtain the config #
Go to the website of your VPN provider website and generate a WireGuard configuration file.
For Mullvad
Go into the WireGuard configuration section inside your account and select these options:


Save the result as wg0.conf.
It will look a little like this:
[Interface]
Address = 10.152.173.151/32,fd7d:76ee:e68f:a993:d065:246a:a61f:1dcf/128
PrivateKey = uOHkXPjTDL9W0KCOh/DjZRlaa+AORPin/A7e40Fc8G8=
Address = 10.66.170.182/32
MTU = 1320
DNS = 10.128.0.1, fd7d:76ee:e68f:a993::1

[Peer]
PublicKey = nAF0wrLG2+avwQfqxnXhBGPUBCvc3QCqWKH4nK5PfEU=
PresharedKey = nAF0wrLG2+avwQfqxnXhBGPUBCvc3QCqWKH4nK5PfEU=
Endpoint = europe3.vpn.airdns.org:1637
AllowedIPs = 0.0.0.0/0,::/0
PersistentKeepalive = 15
Docker container #
Before we start the container, we need to think about where to put the
configuration.
In most OS’s you can put them in /opt/docker/volumes/wireguard/config, but
on Unraid that directory will not survive a reboot,
which is why I put it in /mnt/cache/appdata/wireguard.
Choose a directory and put your wg0.conf in it.
Then start the container2 (replace the volume accordingly):
docker run -d --name="wireguard" \
       --cap-add NET_ADMIN \
       --cap-add SYS_MODULE \
       --sysctl net.ipv4.conf.all.src_valid_mark=1 \
       --volume /mnt/cache/appdata/wireguard/wg0.conf:/etc/wireguard/wg0.conf \
       --publish 51820:51820/udp \
       --publish 9091:9091 \
       --restart=unless-stopped \
       --pull=always \
       jordanpotter/wireguard
If it tells you that the named container already exists, you can remove it like this:
docker stop wireguard 2>/dev/null
docker rm wireguard 2>/dev/null
Debugging #
Look the logs:
docker logs wireguard
Success would look something like this:
docker logs wireguard
[#] ip link add dev wg0 type wireguard
[#] wg setconf wg0 /dev/fd/63
[#] ip -4 address add 10.152.173.151/32 dev wg0
[#] ip -6 address add fd7d:76ee:e68f:a993:d065:246a:a61f:1dcf/128 dev wg0
[#] ip link set mtu 1320 up dev wg0
[#] resolvconf -a wg0 -m 0 -x
could not detect a useable init system
[#] wg set wg0 fwmark 51820
[#] ip -6 rule add not fwmark 51820 table 51820
[#] ip -6 rule add table main suppress_prefixlength 0
[#] ip -6 route add ::/0 dev wg0 table 51820
[#] ip6tables-restore -n
[#] ip -4 rule add not fwmark 51820 table 51820
[#] ip -4 rule add table main suppress_prefixlength 0
[#] ip -4 route add 0.0.0.0/0 dev wg0 table 51820
[#] echo Skipping setting net.ipv4.conf.all.src_valid_mark
Skipping setting net.ipv4.conf.all.src_valid_mark
[#] iptables-restore -n
IPv6 interface not found, skipping IPv6 kill switch
If it says ‘Could not resolve host’, try restarting the container:
docker restart wireguard
Try to generate another config or remove the ipv6 entries from your config.
Test connectivity #
We want to make sure the your wireguard container masks any of your requests by routing them through the configured VPN connection. We can test this with the service ipinfo. They will tell you what public IP made the request. Make a request against the service through the wireguard network:
printf "ifconfig.io: "
docker run --rm --net=container:wireguard docker.io/curlimages/curl -Ss ifconfig.io
printf "ipinfo.io: "
docker run --rm --net=container:wireguard docker.io/curlimages/curl -Ss ipinfo.io
The output will look like this:
{
  "ip": "185.209.196.210",
  "city": "Frankfurt am Main",
  "region": "Hesse",
  "country": "DE",
  "loc": "50.1155,8.6842",
  "org": "AS39351 31173 Services AB",
  "postal": "60306",
  "timezone": "Europe/Berlin",
  "readme": "https://ipinfo.io/missingauth"
}
The IP you get should be different from you home address:
curl -Ss https://ipinfo.io
Enable port forwarding #
If your VPN provider supports port forwarding (most do not - AirVPN does), activate it on a port of your choosing:
Activate port forwarding on AirVPN
In the client area under Ports you can add a
new port: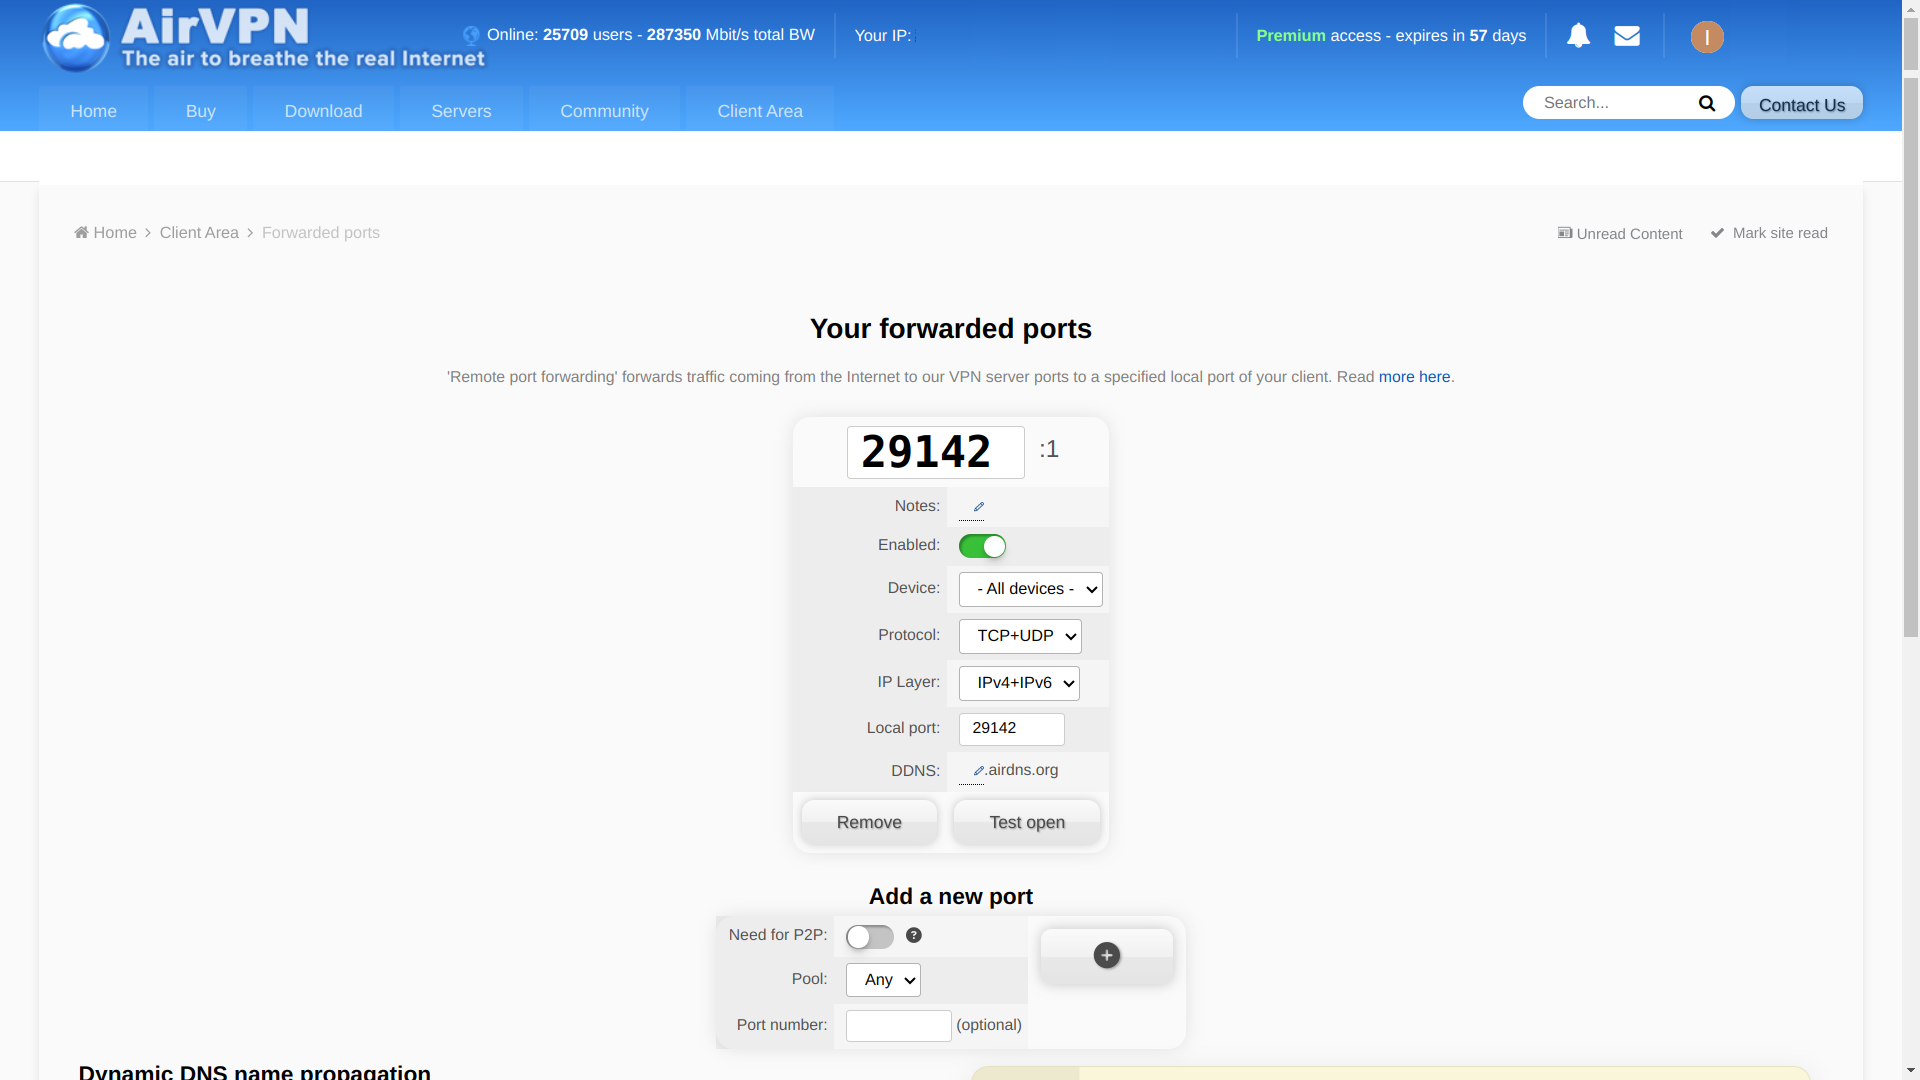
Put these lines in your wireguard startup script to let your containers use the ports configured with your VPN provider:
--publish 29142:29142/udp \
--publish 29142:29142 \
Transmission #
Transmission, as your torrent client, will route all of it’s traffic
through the previously established --network=container:wireguard.
Docker container #
Decide where to store configs and downloaded files. I use the Unraid conventions.
Then start the container:
docker run -d --name="transmission" \
    --volume /mnt/cache/appdata/transmission:/config \
    --volume /mnt/user/media/torrents:/downloads \
    --network=container:wireguard \
    --env PUID=99 \
    --env PGID=100 \
    --env USER=transmission \
    --env PASS=1234 \
    --env TZ="Europe/Berlin" \
    --restart=unless-stopped \
    linuxserver/transmission
The line --network=container:wireguard is the crux of this whole setup.
All of transmissions traffic is routed through that container, which in turn routes it through your VPN provider.
Your local IP will not be exposed should the VPN connection fails for whatever reason.
You can test this by making a request through the container. You will observe that the same IP is being used as for requests made through the wireguard container:
docker exec transmission sh -c 'curl -Ss https://ipinfo.io'
If you have configured port forwarding earlier, activate it for transmission
by adding --env PEERPORT=29142 to the startup script.
Install a web UI: flood #
I use flood as my web interface for transmission. See the list of browser-based remote controls for other options. Flood comes in its own container:
docker run -d --name=tflood \
    -p 3000:3000 \
    -e HOME=/config \
	--volume /mnt/user/appdata/flood:/config \
    jesec/flood
Flood is now available on the port 3000.
For flood to be able to access the transmission behind wireguard you will need:
- the wireguard container to be available on the (local) network
- have transmissions interface port be exposed by the wireguard container
For 1. have a look at the wireguard container documentation section about just that.
For my part I bind the app to an ip on the local network with: --net='br0' --ip='192.168.178.7'.
As for 2., this was already taken care of in previous section by: --publish 9091:9091.
Upon reaching floods initial authentication page use these values:
- client: Transmission (duh)
- url:
http://localhost:9091/transmission/rpc(or your configured ip instead of localhost) - transmission user:
transmission(or your choice in transmissions--env USER=) - transmission password:
1234(definitely change this in--env PASS=) - flood user: any name
- flood password: any password
You can now test transmissions ability to download and seed. For example by adding the archlinux iso.
Putting it all together #
On my server I have scripts to (re)start each container and a script that (re)starts them in order. These scripts include a lot of quirky little steps that might not be necessary, but were added over time to make it run more smoothly.
Below is exactly what I am running minus the secrets. It’s just here so you have an example of what the whole thing looks like for me.
wireguard:
#! /bin/sh

docker stop wireguard 2>/dev/null
docker rm wireguard 2>/dev/null
docker run -d --name="wireguard" \
       --cap-add NET_ADMIN \
       --cap-add SYS_MODULE \
       --sysctl net.ipv4.conf.all.src_valid_mark=1 \
       --volume /mnt/cache/appdata/wireguard/wg_confs/airvpn_eu.conf:/etc/wireguard/wg0.conf \
       --publish 51820:51820/udp \
       --publish 29142:29142/udp \
       --publish 29142:29142 \
       --publish 9091:9091 \
       --net='br0' --ip='192.168.178.7' \
       --label net.unraid.docker.icon="https://raw.githubusercontent.com/NightMeer/Unraid-Docker-Templates/main/images/wireguard.png" \
       --restart=unless-stopped \
       --pull=always \
       jordanpotter/wireguard

sleep 5
printf "ifconfig.io: "
docker run --rm --net=container:wireguard docker.io/curlimages/curl -Ss ifconfig.io
printf "ipinfo.io: "
docker run --rm --net=container:wireguard docker.io/curlimages/curl -Ss ipinfo.io
transmission:
#! /bin/sh

docker stop transmission 2>/dev/null
docker rm transmission 2>/dev/null
docker run -d --name="transmission" \
    --volume /mnt/cache/appdata/transmission:/config \
    --volume /mnt/user/media/torrents:/downloads \
    --volume /mnt/user/media/torrents/complete:/done \
    --volume /mnt/user/syncthing/media/torrents:/downloads/watch/sync \
    --volume /mnt/user/media/movies/torrents:/movie \
    --volume /mnt/user/media/documentaries/torrents:/docu \
    --volume /mnt/user/media/series:/series \
    --volume /mnt/user/media/myseries:/docuseries \
    --volume /mnt/user/media/standup:/standup \
    --volume /mnt/user/media/requests:/req \
    --volume /mnt/user/media/requests-series:/reqs \
    --volume "/mnt/user/media/audiobooks/non-fiction audio":/nonfic \
    --volume "/mnt/user/media/audiobooks/fiction audio":/fic \
    --volume /mnt/user/media/books/fiction:/booksfic \
    --volume /mnt/user/media/books/books:/books \
    --volume /mnt/user/syncthing/media/_inbox:/dl \
    --network=container:wireguard \
    --env PUID=99 \
    --env PGID=100 \
    --env USER=transmission \
    --env PASS=__mypasshere__ \
    --env TRANSMISSION_WEB_HOME=/config/web/transmission-web-control \
    --env PEERPORT=29142 \
    --env TZ="Europe/Berlin" \
    --label net.unraid.docker.icon="https://raw.githubusercontent.com/linuxserver/docker-templates/master/linuxserver.io/img/transmission-logo.png" \
    --restart=unless-stopped \
    linuxserver/transmission

sleep 5
docker exec transmission sh -c 'curl -Ss https://ipinfo.io'
Nginx proxy manager provides a local domain for the rarely used transmission web control on “192.168.178.7:9091”.
I can also access transmission through the command line: transmission-remote 192.168.178.7:9091 --auth=$TRANSMISSION_USER:$TRANSMISSION_PASS.
See my related aliases and scripts.
flood:
#! /bin/sh

docker stop tflood 2>/dev/null
docker rm tflood 2>/dev/null
docker run -d --name=tflood \
	-p 3000:3000 \
	-e HOME=/config \
	--volume /mnt/user/appdata/flood:/config \
	--net='br0' --ip='192.168.178.10' \
	--label net.unraid.docker.icon="https://hotio.dev/webhook-avatars/flood.png" \
	jesec/flood:4.9.3
# latest (4.9.5 was broken)
Nginx proxy manager provides a local domain for flood running on “192.168.178.10:3000”.
Now all together.
start:
#!/bin/sh

./wireguard
./transmission && ./mam-ip
./flood
mam-ip is a script of mine, that lets a private tracker know of my new IP
address.
Conclusions #
That’s it folks. This should give you all you need to reproduce my setup for yourself. Enjoy🙂
References #
Originally this setup was based on this reddit post. Many adjustments were made.
Other torrent daemons
You can easily replace transmission with any other containerized torrent daemon. The wireguard container network allows for it and you should have everything here that you need.
Other ways of testing connectivity:
In the comments of reddit post there are also other ways of testing connectivity described. Though, I’m just fine with ipinfo.
AirVPN has a proven track record of not handing over user data (they can’t hand over something they don’t have.) They are one of the few providers of that caliber, which still supports port forwarding. You can pay in crypto and test it for three days (2€). ↩︎
The image I use is jordanpotter/wireguard. Unlike linuxserver/wireguard it has a kill switch (see linuxserver issue), has working ipv6 and is easier to configure. ↩︎