Easily collect website feedback
Table of Contents
I have this website. It will necessarily include errors. I would like to make it as easy as possible for other people to help me fix them. If somebody spots an error, there
I would categorize people that want to help into the categories of:
- Known vs unknown: if the person knows the author directly
- Technical vs non-technical: if the person is capable of editing the source and submitting a patch
If you don’t provide people who are willing to help with another option, they will communicate change requests through these communication channels:
| Unknown | Known | |
|---|---|---|
| Non-technical | Email or private messenge | |
| Technical | Email or private messenge |
When I see a typo while browsing, I will navigate to the contact page and write the website owner an email (or use a contact form, if applicable.)
The issue with email #
It’s better than nothing, but a few problems will crop up:
- People have to leave the website to write an email or take notes.
- Corrections will be inconsistent or have information missing.
- Visual defects are hard to describe through just text.
- It’s a missed opportunity. Technical people might be willing to do the correction for you.
We can do better than that.
Overview of solutions #
Let’s go through our options for each type of person:
- Unknown, non-technical person: They are the people least likely to be interested in helping and it is the hardest to set something up for them.
- Known, non-technical person: Much more willing to help and we can provide them credentials to a tool.
- Technical person: The most interested in helping and most capable at doing so. Give them an easy way to submit patches.
By putting this in a table, we get:
| Unknown | Known | |
|---|---|---|
| Non-technical | Tool | |
| Technical | Submit a patch | Submit a patch |
The concrete solutions I have implemented are detailed below. How hard or easy they are for you to adopt, depends entirely on your setup. There might be comparable variants in whatever you are using. Even if you can not make use of them directly, the principles will be the same.
These are the solutions that I am using and will detail below:
| Unknown | Known | |
|---|---|---|
| Non-technical | Netlify Drawer | |
| Technical | Edit on Github button | Edit on Github button or Netlify Drawer |
Netlify Drawer #
Netlify has embedded a tool for submitting feedback directly without leaving the page.
The obvious requirement: Your site has to be hosted on Netlify.
How does it work? #
At the bottom of the page there is a UI element.

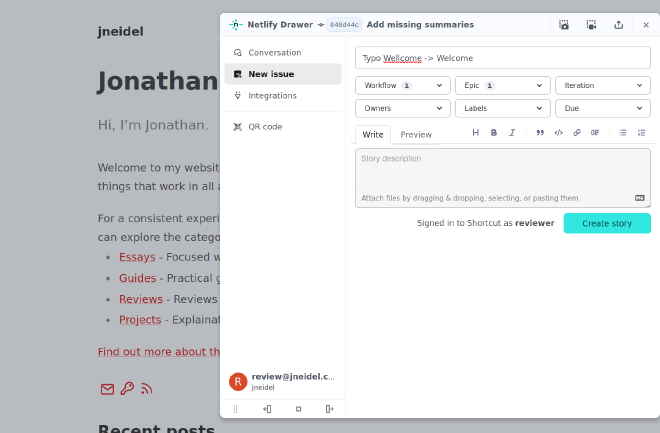
Clicking it will expand it, to reveal a form. Through this form you can submit text, take screenshots or record video1. What ever fits best to document the defect, submit a correction or suggest something.

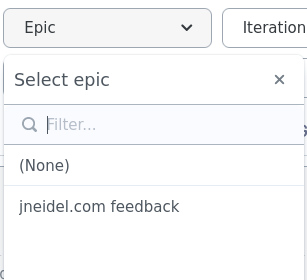
Make sure to assign an epic, so the owner will be notified:

That’s it from the user perspective. They just send of their report and close the drawer. As the site operator, I get an email with all the info I need to fix the reported issue:

Setup #
This is how you can configure your own site to use the Netlify Drawer just like this.
- Setup a parallel deployment with the Netlify Drawer activated
- Create a reviewer Netlify account
- Create two Shortcut accounts
- Configure Shortcut accounts
- Configure Netlify reviewer account
1. Setup a parallel deployment with the Netlify Drawer activated #
We don’t want have the Netlify Drawer active on the main site, since we only want the reviewers to be able to see it. We need a parallel deployment, which mirrors production, and has the Netlify Drawer enabled.
Do configure that we log into Netlify and:
- Create a new site
- Supply the same repo as build source
- (Optional: Change the build command -> I also make drafts visible.)
- Under “Branches and deploy contexts”:
- Set the production branch to “none” or something invalid.
- Add your master branch under “Branch deploys” (Netlify Drawer only works on branches deployments, not on the production deployment.)
- Scroll down to “Collaboration tools” and make sure it is enable on branch deployments.
Now whenever you deploy push to your master branch, you will also get a secondary deployment with Netlify Drawer enabled. The working link will be branch + site name. Like this:
https://master--jneidel-stage.netlify.app
2. Create a reviewer Netlify account #
We want to have a reviewer account whose credentials we can just pass along to all our reviewers. Let’s create a new account for that. It’s easiest if you start by inviting the new account as a reviewer to your team under “Team > Members > Reviewers > Add Reviewer.” Then just sign-up from the email you received.
3. Create two Shortcut accounts #
Head over to Shortcut, to first create an account for yourself. If you sign-up with an email from Kill the Newsletter you can get all communication (i.e. future notifications of changes) through a RSS feed.
After your primary account is signed-up, we want to create another account for our reviewers to use. From the primary account invite the reviewer email to your shortcut team. Then go through that accounts sign-up flow as well.
4. Configure Shortcut accounts #
While on your primary account, go into “Settings > Notifications” and enable “Most Events.”
Select the “Epics” section in the sidebar under “Teams > All Work” and create a new epic for your reviewers to create issues in. Assign yourself as owner, so that you will be notified of any new issues that are created in that epic.
While on the secondary reviewer account, go into “Settings > API Tokens” to create a new token and save it for the next step.
5. Configure Netlify reviewer account #
Open your secondary Netlify deployment, open the drawer and log in with the Netlify reviewer account. Go into integrations and connect to Shortcut by pasting in the API Token for the Shortcut reviewer account created in the previous step.
6. Profit #
Now everything is setup and you can pass the credentials to the Netlify reviewer account and linkt to the secondary deployment along to your reviewers. You will be notified of their reports via email.
Edit on Github #
If you website sources are hosted publicly, everyone will be able to suggest improvements. Otherwise you need to grant access to individual reviewers to be able to receive their suggestions
In my case the website’s repo is hosted on Github.
How does it work? #
I have a button at the top of the page that leads to the markdown source file of that page.

That buttons leads to this page:
https://github.com/jneidel/jneidel.com/blob/master/content/guide/collect-website-feedback/index.md
A technical user can edit the page and submit a pull request. You can try it yourself at the top of this page.
Setup #
You need to find a way to generate and embed the link the source file into the page. That is something my hugo theme (congo) does for me.
Setup with congo #
I just supply this config:
[params.article]
    showEdit = true
    editURL = "https://github.com/jneidel/blog/tree/master/content/"
    editAppendPath = true
Within congo, to change the icon to the GitHub logo: copy
layouts/partials/meta/edit.html in your own project and edit ->
github.
To change the hover title, add this to your i18n/en.yaml:
article:
  edit_title: "Edit content on GitHub - Thanks for submitting a pull request!"
Conclusions #
If come across problems on this website feel to use the edit button below the title or let me know via email 🙂
You can read more about it in Netlify’s docs. ↩︎